

Photographing Pumpkin Custard Pie: Warm Autumn Lighting and Styling Ideas
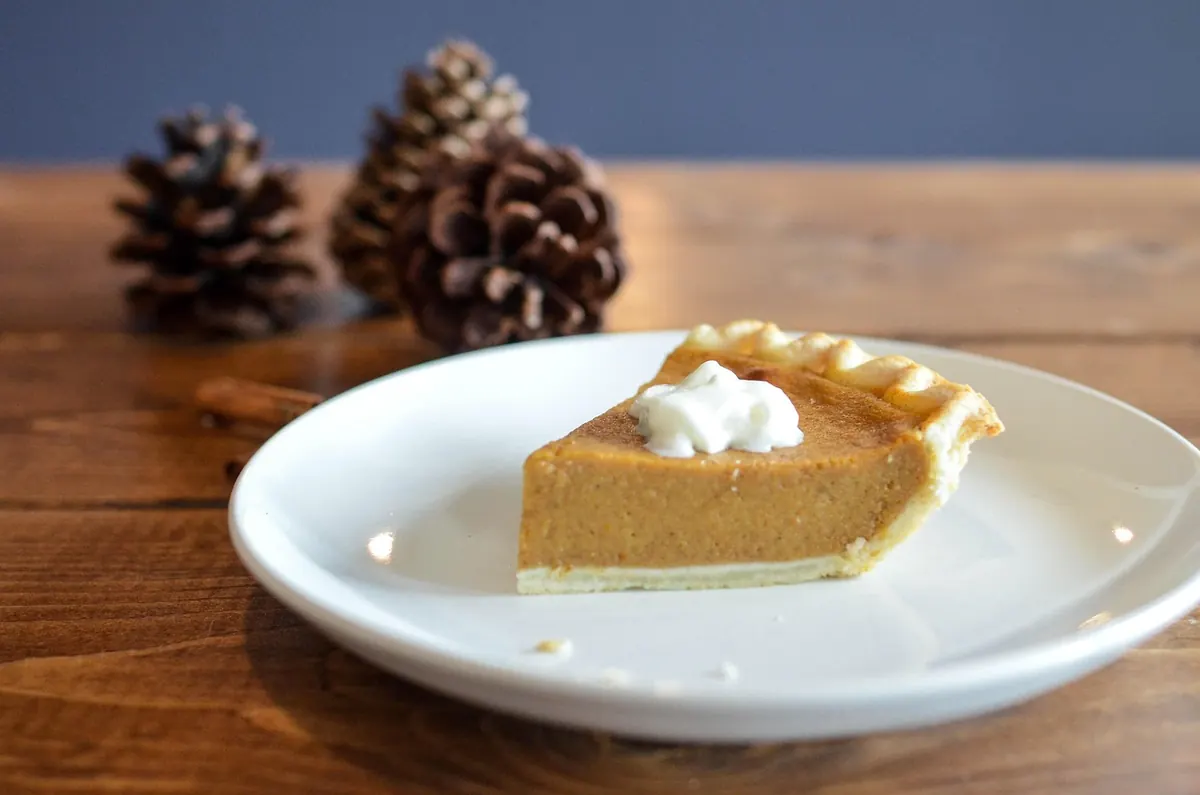
A pumpkin custard pie is not a pretty dessert in the obvious way. There is no glossy ganache, no towering meringue, nothing that sparkles. What it has is color — deep orange fading to amber at the edges — and a surface that catches light the way a low autumn sun crosses a field. Get the lighting right and the pie does most of the work. Get it wrong and it reads as brown mud on a plate. Here is how to shoot pumpkin custard pie and the rest of your Thanksgiving desserts so the custard glows and the crust still looks flaky.
Start With What Custard Actually Does to Light
Custard is semi-translucent. Light passes a little way into it, scatters, and comes back out, which is why a slice photographed with light behind it looks lit from within. From the front, though, the filling is fairly matte: it gives you a soft gradient rather than a bright highlight. That is the opposite of what a flaky crust wants. Crust has ridges and edges, and it only reveals them under raking side light.
So you are solving two problems at once. Your key light should be soft enough to keep the custard smooth, angled enough to graze the crust, and warm enough to flatter the orange without staining everything around it. Underexposure is the most common mistake: pumpkin filling loses its color fast and turns to a flat brown when you expose for the highlights too aggressively.
Warm light is not the same as orange light. The pie should look like a pie, not like a filter.
Build the Warm Light Before You Style Anything
Natural light does most of this for free. A west- or south-facing window in the two hours before sunset gives you the exact color temperature that suits pumpkin — and it moves, so you have to work quickly. A north-facing window is softer but cooler and often needs a small warm bounce to bring the filling back to life.
Diffuse the window with a sheer curtain or a sheet of ripstop nylon taped to the glass frame. If the light is still too harsh, move the table farther from the window instead of adding more diffusion; distance softens as effectively as fabric and costs nothing.
For evening shoots, one LED panel or strobe through a large diffuser at 45 degrees does the job. Skip on-camera flash — it flattens the crust and puts a hard specular streak on the filling. If your lamps are warm white, set white balance manually rather than relying on auto, which will chase the color as you move props. Drop a white napkin into the frame while you check: if the napkin turns orange, your white balance is off, not your styling.
The One-Light Setup That Works All Season
- Position the pie about a meter from the window, with the light coming from behind and slightly to one side. That back-left or back-right placement gives you a soft gradient across the filling and a bright edge on the far crust.
- Add a white foam board on the shadow side, roughly 30 to 40 centimeters away and angled toward the pie. Move it closer for gentle fill, farther for moodier contrast. A tan or parchment-colored card bounces warmer light than white does.
- Flag the background if it is too bright. A black card placed behind the pie keeps the eye on the custard and deepens the shadows in the styling.
- Choose your camera height deliberately. Around 25 to 35 degrees above the table shows the whole pie and the surface it sits on. Drop to surface level when you want the cut edge of a slice to be the subject.
- Use a tripod and stop down. f/4 to f/5.6 keeps a whole pie sharp at a slight angle; f/2.8 is fine for a single slice. Bracket with shutter speed, not aperture, so the depth of field stays put.
- Expose for the brightest part of the custard and check the histogram. If the top of the filling is clipped, pull back a third of a stop and let the crust fall slightly dark.
Styling: Surfaces, Linens, and a Few Good Props
Pumpkin pie styling goes wrong when it gets too literal. Small weathered pumpkins, a scattering of cinnamon sticks, and one brass spoon are plenty. Plastic gourds, cornucopias, and a dozen star anise are not.
- Surfaces: aged walnut, reclaimed pine, slate, dark ceramic tile. Warm wood gives you the autumn palette without any props at all.
- Linens: unbleached linen or a waffle-weave towel, rumpled rather than ironed. A pressed napkin looks like a catalog; a soft fold looks like a kitchen.
- Props: vintage flatware, an enamel dish, a cast iron skillet if the pie was baked in one, a rolling pin, whole nutmeg, a few pecans.
- Color: two warm tones plus one cool accent. Sage green, blue-grey linen, or a muted teal plate keeps the scene from turning into a solid wall of orange.
- Height: a footed plate, a cake stand, or a stack of books under the linen creates dimension and gives you foreground to blur.
- Negative space: leave one corner empty. Give the eye somewhere to rest.
Slices, Crust, and the Crack
Chill the pie completely before cutting. Wipe the knife between slices with a hot, damp cloth, then dry it — a wet blade smears the custard and ruins the cut face. Lift the first slice with a pie server and set it slightly forward, rotated so the cut edge faces the light. Backlight that slice and the custard will glow through the filling while the crust stays crisp and layered.
Cracks happen when custard overcooks or cools too fast. If yours cracked, either angle the pie so the crack falls into shadow, or lean into it — a small crack reads as homemade. Covering the entire surface in whipped cream solves the problem but also removes the texture that makes the photograph interesting.
Whipped cream should be soft peaks, spooned into a loose swirl or a quenelle. If you are adding ice cream, scoop it a few minutes early, let it soften, then reshape it with a spoon so it looks scooped rather than extruded. Steam only works with a pie straight from the oven: set up your shot first, shoot against a dark background with backlight, and work inside 90 seconds.
Color and Post: Warm Without Going Muddy
Shoot RAW. In editing, push the temperature up modestly and watch the neutrals — a white plate or napkin should still read white. Custard can drift yellow-green under some LED sources, and a small magenta tint adjustment usually corrects it. Lift orange luminance in HSL rather than saturation, which keeps the filling bright instead of neon, and avoid crushing the blacks. Warm images need open shadows or the whole frame looks heavy.
A Ten-Minute Test Before Thanksgiving
Bake the pie a day early, shoot one slice, and write down your settings. Note the camera height, the distance to the window, and where the bounce card sat. When the real meal arrives and the light is disappearing, you will already know the setup, and you can spend your time on the pie instead of the tripod. If the day turns grey, move the table closer to the window, add the tan card, and shoot the slice rather than the whole pie — a single glowing wedge of custard is a better autumn photograph than a dull plate shot in flat light.
Photo: Element5Digital / Pixabay